-
Arif Uz Zaman Badhon
- Published Date:
Share This
The AI engineering landscape is shifting. While cloud-based LLM APIs are great for prototyping, running continuous, multi-agent workflows quickly becomes an expensive logistical headache. If you want true Data privacy, zero inference costs, and deep system-level control, you need to run your orchestration at the edge.
Today, we are looking at how to wire OpenClaw—a powerful protocol-first agent orchestrator—directly into Ollama, running entirely on local hardware.
If you are running Apple Silicon (M-series), this stack effectively turns your machine into a highly capable, autonomous processing node. Here is the step-by-step schematic for getting the system online.
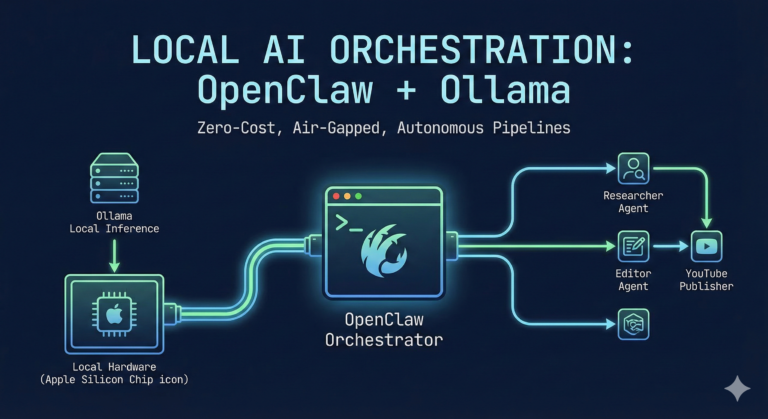
The Architecture
By default, OpenClaw is configured to phone home to cloud providers like Anthropic or OpenAI. Our goal is to sever that external dependency and route the “brain” of the agent to a local Ollama instance running models like llama3.3 or mistral.
Think of OpenClaw as the motherboard and orchestration bus, and Ollama as the local CPU/GPU doing the actual heavy lifting.
Step 1: Energizing the Gateway
OpenClaw relies on a background gateway daemon to handle context windows, tool calling, and web UI routing. While you can install it as a background system service, running it in the foreground is much better for initial debugging and observing real-time inference logs.
Open a terminal tab and start the gateway:
openclaw gateway
Leave this tab open. This is your active serial monitor. You should see it listening on ws://127.0.0.1:18789.
Step 2: Re-wiring the Default Provider
With the gateway running, open a second terminal tab. We need to overwrite the system matrix to prioritize local inference.
In the latest 2026 builds of OpenClaw, configuration is handled via strict dot-path commands rather than conversational flags. To set Ollama as the primary driver for your main agent, run:
openclaw config set agents.defaults.model.primary "ollama/llama3.3"
(Note: Replace llama3.3 with your preferred local model downloaded via Ollama).
Step 3: The System Diagnostic
When changing core providers, port bindings or background services can sometimes get stuck holding old configuration states. OpenClaw includes a built-in diagnostic tool that acts as a fantastic MLOps health check.
Run the doctor command to automatically detect your Ollama instance and repair any broken links:
openclaw doctor --fix
If you run into persistent “Port in Use” errors during setup, you may need to manually kill the ghost process (kill -9 <PID>) and restart the gateway to ensure the new Ollama configuration loads cleanly.
Step 4: Hatching the Agent
Once the system is wired and healthy, it’s time to interact. OpenClaw has moved away from simple chat commands in favor of a robust Terminal User Interface (TUI) or web dashboard.
To open the command center and start passing prompts to your local model:
openclaw tui
You should see a status line confirming your connection: connected | idle | agent main | ollama/llama3.3.
From here, you can command the agent to search the web, read local files in its workspace, or execute terminal commands—all processed locally on your hardware.
Why This Stack Matters for MLOps
Building on the OpenClaw + Ollama stack offers several massive advantages:
-
Zero-Cost “Heavy Lifting”: Agentic workflows require constant looping, tool-calling, and reasoning. By leveraging local Unified Memory, you get near-instant inference for heavy tasks without paying per token.
-
Air-Gapped Security: Your agent operates within a dedicated
~/.openclaw/workspace. You can feed it sensitive internal documents or proprietary codebase architectures without ever leaking data to an external server. -
True Modularity: This basic setup is just the foundation. From here, you can register specialized sub-agents (e.g., a “Researcher” using Llama 3.3 and a “Formatter” using Mistral) and orchestrate complex, multi-step pipelines entirely from the command line.
We are past the point of treating AI as just a text box in a browser. By integrating these two tools, you gain a localized, autonomous engine ready for real engineering work.